Getting Started with FRP - A Comprehensive Setup Guide
Introduction
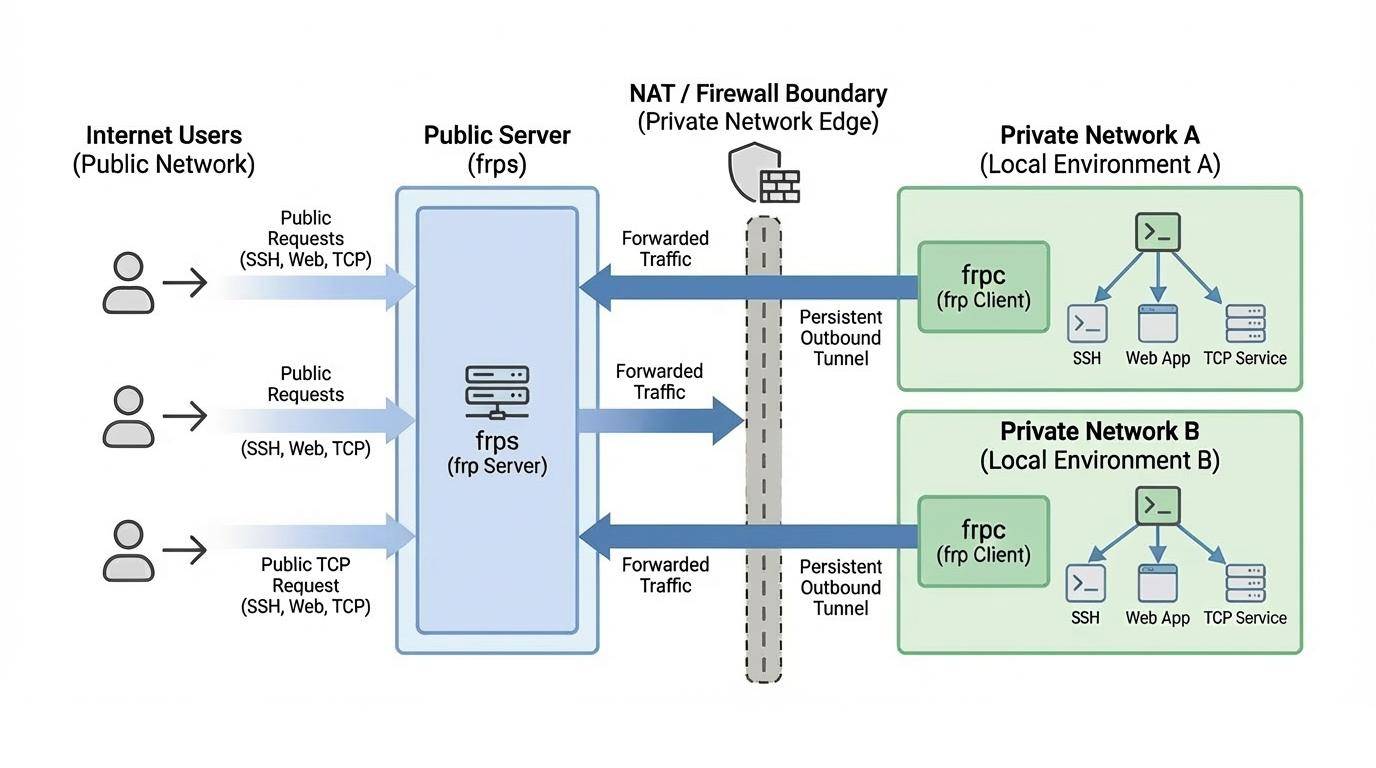
FRP (Fast Reverse Proxy) is a high-performance reverse proxy application that allows you to expose a local server behind a NAT or firewall to the internet. It is particularly useful for scenarios where you need to access services on your home or office network from anywhere in the world.
Why use FRP?
- Easy to use: Simple configuration files and straightforward deployment.
- Versatile: Supports multiple protocols including TCP, UDP, HTTP, and HTTPS.
- High Performance: Optimized for speed and low resource usage.
- Security: Supports encryption and compression for data transmission.
Download FRP
You can find the latest releases of frp on their official GitHub repository: https://github.com/fatedier/frp.
Steps to download:
- Go to the Releases page.
- Select the version appropriate for your operating system (e.g., frp_0.68.1_linux_amd64.tar.gz).
Linux Command:
To download and extract frp on a Linux server, you can use the following commands:
1 | wget https://github.com/fatedier/frp/releases/download/v0.68.1/frp_0.68.1_linux_amd64.tar.gz |
Remember to replace the link and filename with the one you want.
Configure FRPS
frps is the server-side component that should be run on a machine with a public IP address.
- Locate the
frps.tomlfile in the extracted directory. - Edit the configuration to specify the port frps will listen on:
1 | # 1. frp listening setting |
- Start the server:
1 | ./frps -c ./frps.toml |
Configure FRPC
frpc is the client-side component that runs on your local machine behind the NAT.
- Locate the
frpc.tomlfile. - Configure it to connect to your
frpsserver and define the services you want to expose:
1 | # 1. Connection with server |
- Start the client:
1 | ./frpc -c ./frpc.toml |
Configure systemd
To allow frps and frpc to run stably in the background and start on boot, we will configure systemd.
- Move the executable file to system directory.
frps:
1 | sudo cp frps /usr/local/bin/ |
frpc:
1 | sudo cp frpc /usr/local/bin/ |
- Create systemd config directory.
frps:
1 | sudo mkdir /etc/frp && sudo cp frps.toml /etc/frp/ |
frpc:
1 | sudo mkdir /etc/frp && sudo cp frpc.toml /etc/frp/ |
- Create service file.
frps:
1 | sudo vim /etc/systemd/system/frps.service |
1 | [Unit] |
frpc:
1 | sudo vim /etc/systemd/system/frpc.service |
1 | [Unit] |
- Start service.
frps:
1 | sudo systemctl enable frps |
frpc:
1 | sudo systemctl enable frpc |
- Title: Getting Started with FRP - A Comprehensive Setup Guide
- Author: Fireflies
- Created at : 2026-05-15 19:48:15
- Updated at : 2026-07-08 07:17:24
- Link: https://fireflies3072.github.io/frp-tutorial/
- License: This work is licensed under CC BY-NC-SA 4.0.